
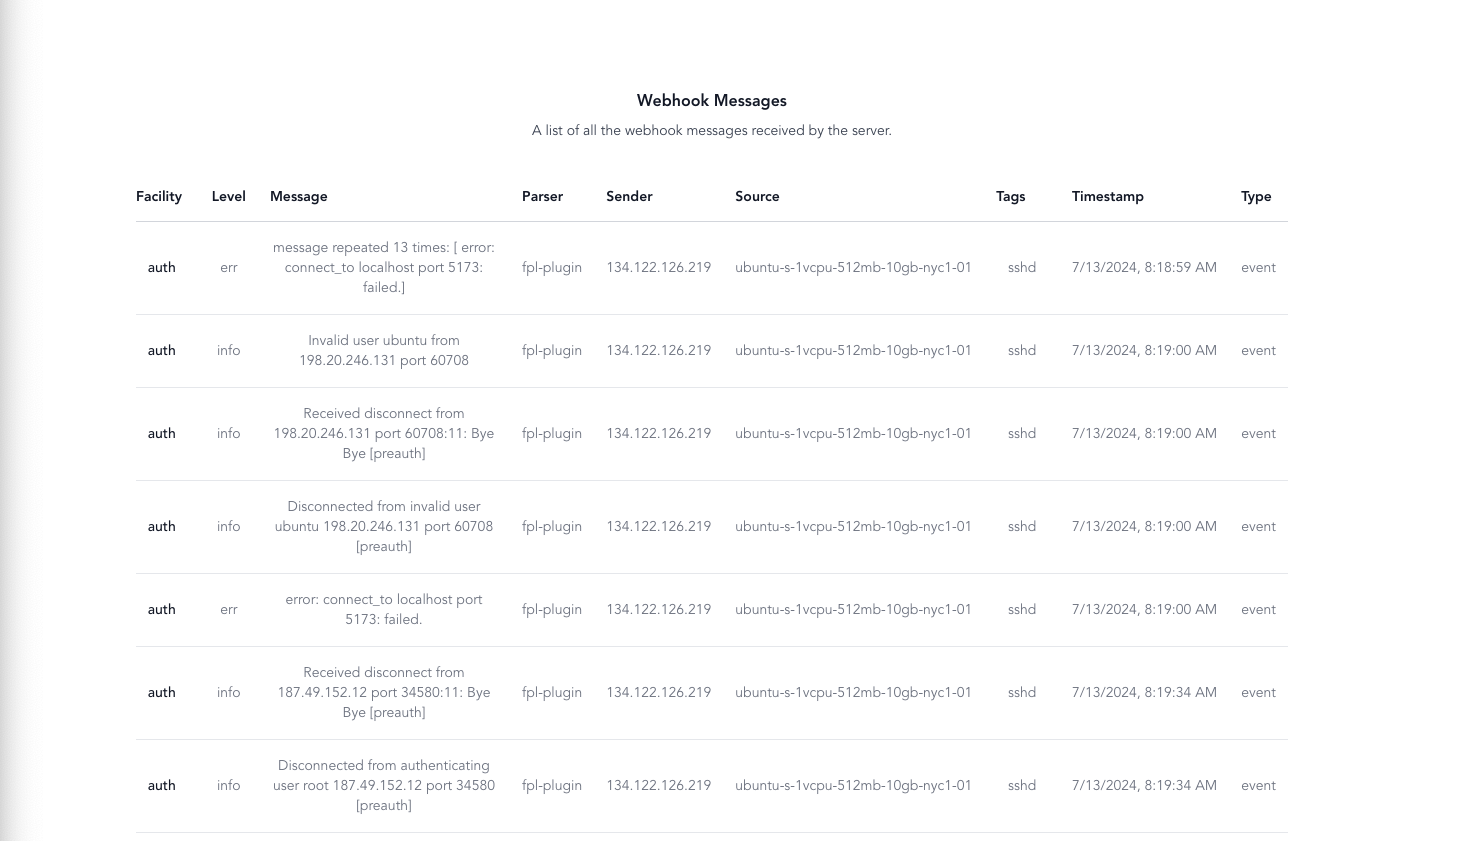
Creating Realtime Dashboards
In our "Get Started" section we created an HTTP Event Connector (HEC) and a Webhook. Now we can have data coming from a syslog and send it to a Webhook.
It looks something like this in Ingext:

We can see the data moving through the system. But what can we do with that data besides put it into a database. Webhooks are common for Security Orchestration Automation and Response (SOAR) tools.
But we can also use this data to create realtime dashboards. We need two things to make this happen:
- Create a Websocket
- Create a Vue App to read the socket
A WebSocket is a communication protocol that provides full-duplex (two-way) communication channels over a single, long-lived connection between a client (such as a web browser) and a server. This means that once a WebSocket connection is established, both the client and the server can send and receive messages to each other at any time, without needing to re-establish the connection.
Like HEC and Webhooks, websockets are a piping protocol and fit perfectly into the Ingext world of doing things.
Creating a Websocket
We are going to do this in a simple manner of using NodeJs.
- Install necessary packages if you haven’t already:
npm install express morgan ws body-parser- Create the node server:
Create a file called websocket-server.js and use this code.
/* eslint-disable no-console */
const express = require("express");
const { join } = require("path");
const morgan = require("morgan");
const bodyParser = require("body-parser");
const WebSocket = require("ws");

const app = express();
const port = 3000;

// Middleware
app.use(morgan("dev"));
app.use(bodyParser.json());

// Serve the Vue3 application
app.use(express.static(join(__dirname, "dist")));

app.use((_, res) => {
  res.sendFile(join(__dirname, "dist", "index.html"));
});

// Create WebSocket server
const wss = new WebSocket.Server({ noServer: true });

// WebSocket connection handling
wss.on("connection", (ws) => {
  console.log("Client connected");

  ws.on("close", () => {
    console.log("Client disconnected");
  });
});

// Webhook endpoint to receive messages
app.post("/webhook", (req, res) => {
  const message = req.body;
  console.log("Received message:", message);

  // Broadcast the message to all connected WebSocket clients
  wss.clients.forEach((client) => {
    if (client.readyState === WebSocket.OPEN) {
      client.send(JSON.stringify(message));
    }
  });

  res.status(200).send("Message received");
});

// Upgrade HTTP server to handle WebSocket connections
const server = app.listen(port, () => {
  console.log(`Listening on port ${port}`);
});

server.on("upgrade", (request, socket, head) => {
  wss.handleUpgrade(request, socket, head, (ws) => {
    wss.emit("connection", ws, request);
  });
});- Test the Web Socket Server:
To run this:
node websocket-server.jsWe can use a test packet, so we do not need to wait for a real event.
curl -X POST http://localhost:3000/webhook \
     -H "Content-Type: application/json" \
     -d '{
           "@facility": "auth",
           "@level": "info",
           "@message": "Disconnected from authenticating user root 103.61.75.236 port 52878 [preauth]",
           "@parser": "fpl-plugin",
           "@sender": "134.122.126.219",
           "@source": "ubuntu-s-1vcpu-512mb-10gb-nyc1-01",
           "@tags": ["sshd"],
           "@timestamp": 1720823636000,
           "@type": "event"
         }'
Create the Vue App
- Create the Vue skeleton.
npm install -g @vue/cli
vue create vue-websocket-app
vue-socket/
npm install- Optional. Install Tailwind
I like tailwind as a format. So, we can install that.
npm install -D tailwindcss@latest postcss@latest autoprefixer@latest
npx tailwindcss init -p
Modify the src/assets/css by adding the tailwind options.
@tailwind base;
@tailwind components;
@tailwind utilities;
Modify the tailwind.config.js
/** @type {import('tailwindcss').Config} */
export default {
  content: [
    './src/**/*.{vue,js,ts,jsx,tsx}',
  ],
  theme: {
    extend: {},
  },
  plugins: [],
}
Finally, we can replace the App.vue file with our page that listens to the web socket.
<template>
  <div class="px-4 sm:px-6 lg:px-8">
    <div class="sm:flex sm:items-center">
      <div class="sm:flex-auto">
        <h1 class="text-base font-semibold leading-6 text-gray-900">Webhook Messages</h1>
        <p class="mt-2 text-sm text-gray-700">A list of all the webhook messages received by the server.</p>
      </div>
    </div>
    <div class="mt-8 flow-root">
      <div class="-mx-4 -my-2 overflow-x-auto sm:-mx-6 lg:-mx-8">
        <div class="inline-block min-w-full py-2 align-middle sm:px-6 lg:px-8">
          <table class="min-w-full divide-y divide-gray-300">
            <thead>
              <tr>
                <th scope="col" class="py-3.5 pl-4 pr-3 text-left text-sm font-semibold text-gray-900 sm:pl-0">Facility</th>
                <th scope="col" class="px-3 py-3.5 text-left text-sm font-semibold text-gray-900">Level</th>
                <th scope="col" class="px-3 py-3.5 text-left text-sm font-semibold text-gray-900">Message</th>
                <th scope="col" class="px-3 py-3.5 text-left text-sm font-semibold text-gray-900">Parser</th>
                <th scope="col" class="px-3 py-3.5 text-left text-sm font-semibold text-gray-900">Sender</th>
                <th scope="col" class="px-3 py-3.5 text-left text-sm font-semibold text-gray-900">Source</th>
                <th scope="col" class="px-3 py-3.5 text-left text-sm font-semibold text-gray-900">Tags</th>
                <th scope="col" class="px-3 py-3.5 text-left text-sm font-semibold text-gray-900">Timestamp</th>
                <th scope="col" class="px-3 py-3.5 text-left text-sm font-semibold text-gray-900">Type</th>
              </tr>
            </thead>
            <tbody class="divide-y divide-gray-200">
              <tr v-for="(message, index) in messages" :key="index">
                <td class="whitespace-nowrap py-4 pl-4 pr-3 text-sm font-medium text-gray-900 sm:pl-0">{{ message['@facility'] }}</td>
                <td class="whitespace-nowrap px-3 py-4 text-sm text-gray-500">{{ message['@level'] }}</td>
                <td class="max-w-xs break-words px-3 py-4 text-sm text-gray-500">{{ message['@message'] }}</td>
                <td class="whitespace-nowrap px-3 py-4 text-sm text-gray-500">{{ message['@parser'] }}</td>
                <td class="whitespace-nowrap px-3 py-4 text-sm text-gray-500">{{ message['@sender'] }}</td>
                <td class="whitespace-nowrap px-3 py-4 text-sm text-gray-500">{{ message['@source'] }}</td>
                <td class="whitespace-nowrap px-3 py-4 text-sm text-gray-500">{{ message['@tags'].join(', ') }}</td>
                <td class="whitespace-nowrap px-3 py-4 text-sm text-gray-500">{{ formatTimestamp(message['@timestamp']) }}</td>
                <td class="whitespace-nowrap px-3 py-4 text-sm text-gray-500">{{ message['@type'] }}</td>
              </tr>
            </tbody>
          </table>
        </div>
      </div>
    </div>
  </div>
</template>

<script>
export default {
  data() {
    return {
      messages: []
    };
  },
  created() {
    this.connectWebSocket();
  },
  methods: {
    connectWebSocket() {
      const socketUrl = process.env.VUE_APP_WEBSOCKET_URL;
      const socket = new WebSocket(socketUrl);

      socket.onmessage = (event) => {
        const message = JSON.parse(event.data);
        this.messages.push(message);
      };

      socket.onopen = () => {
        console.log("WebSocket connection opened");
      };

      socket.onclose = () => {
        console.log("WebSocket connection closed");
      };

      socket.onerror = (error) => {
        console.error("WebSocket error:", error);
      };
    },
    formatTimestamp(timestamp) {
      const date = new Date(timestamp);
      return date.toLocaleString();
    }
  }
};
</script>

<style>
#app {
  font-family: Avenir, Helvetica, Arial, sans-serif;
  -webkit-font-smoothing: antialiased;
  -moz-osx-font-smoothing: grayscale;
  text-align: center;
  color: #2c3e50;
  margin-top: 60px;
}
</style>
Before we run, we need to set the environment:
VUE_APP_WEBSOCKET_URL=ws://your-server-ip-or-hostname:3000This will let the web server to know where the web socket is. You can hardcode this if you have issues.
Finally, you are ready to run the web server.
npm run devResults and Next Steps
You can use the test command to generate data, but the noise on the internet should generate traffic fairly quickly.
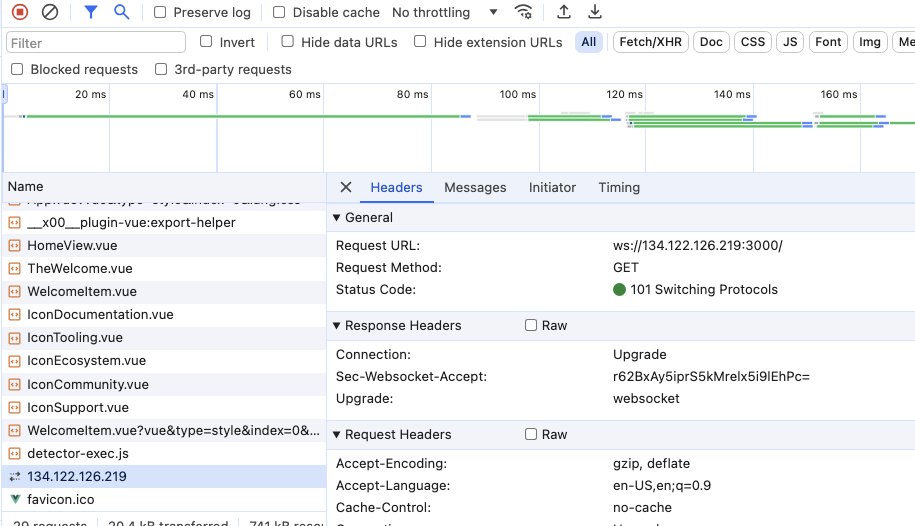
Looking into the Chrome Development Tools, we can see the websocket established and ready to work.
Websocket Advantages
It more than just the fact we are getting data. It is that the page can now get messages when events occur. These events could be Fluency Behavioral Summary changes, notable events, or metric updates.
- Create a data structure that changes with incoming data.
- Use CSS animation to show when changes occur, but also switches to normal after a brief style change.
- Have fun.
Updated over 1 year ago